
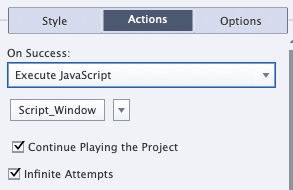
If you’re like me, you’ve discovered that using JavaScript in your Captivate projects can help you build much more rich interactions with less work than relying on standard/advanced/shared actions. But if you have a JavaScript snippet that you want to run when the learner clicks a button, you might have noticed one big drawback with that approach:
When you assign Javascript to a button, you have to choose whether the “Continue Playing the Project” box should be checked or clear. The problem I’ve found with this selection is that checking it will re-start the timeline if it is currently paused, while clearing it will pause the timeline if it is playing when you click the button.
Depending on your project, one or the other of these choices may be fine, but I usually find that I want the button to not interfere with the playbar at all. So if it is playing when the button is clicked, keep playing. But if it’s paused, don’t restart it when the button is clicked. But there really isn’t a setting for that.
Interestingly enough, if you put an advanced action here, that is how it will behave. But it always seemed silly to me to have to potentially manage several different advanced actions that do nothing but call JavaScript. That’s when a buddy shared his solution that solved this once and for all.
Instead of assigning JavaScript to the button’s on success action, I leave that as No Action. Then I add an event handler using JavaScript in the slide’s On Enter action. So Set the On Enter action to Execute JavaScript (here you do want to have the “Continue Playing the Project” box checked), and use jQuery to add a click event handler to the button. Conveniently, you can use the Captivate name of the button as the target. Then add the javaScript you want the button to trigger in the callback function.
So if you have a button called Button_1, it would look like this:
If you’re not familiar with jQuery, this may look odd, but let’s break it down. The $ is just a shortcut for the jQuery library, so we will use it pretty much any time we want access to a DOM element. Inside the parentheses after the $ is just a CSS selector that finds the element with the ID of “Button_1” (# is the CSS selector for ID attribute).
The .click() function adds an “onclick” event handler to the element. The argument is a function. This function doesn’t need a name, so we just put function(){} inside the parentheses for the click() function.
All of your code goes in-between the curly braces in the anonymous function. To re-use it for different buttons, all you need to change is the button name in the selector, and of course the code in the callback function if you need it to do something different.
Hope this helps someone.
The post Why I Never Assign “Execute JavaScript” to Button Success Actions appeared first on eLearning.
How to trigger javaScript from button clicks without interfering with the timeline.
The post Why I Never Assign “Execute JavaScript” to Button Success Actions appeared first on eLearning.Read MoreBlog, Execute Javascript, Interactive eLearning, Adobe Captivate, blog, execute javascript, interactive elearning, Tips and Tricks